

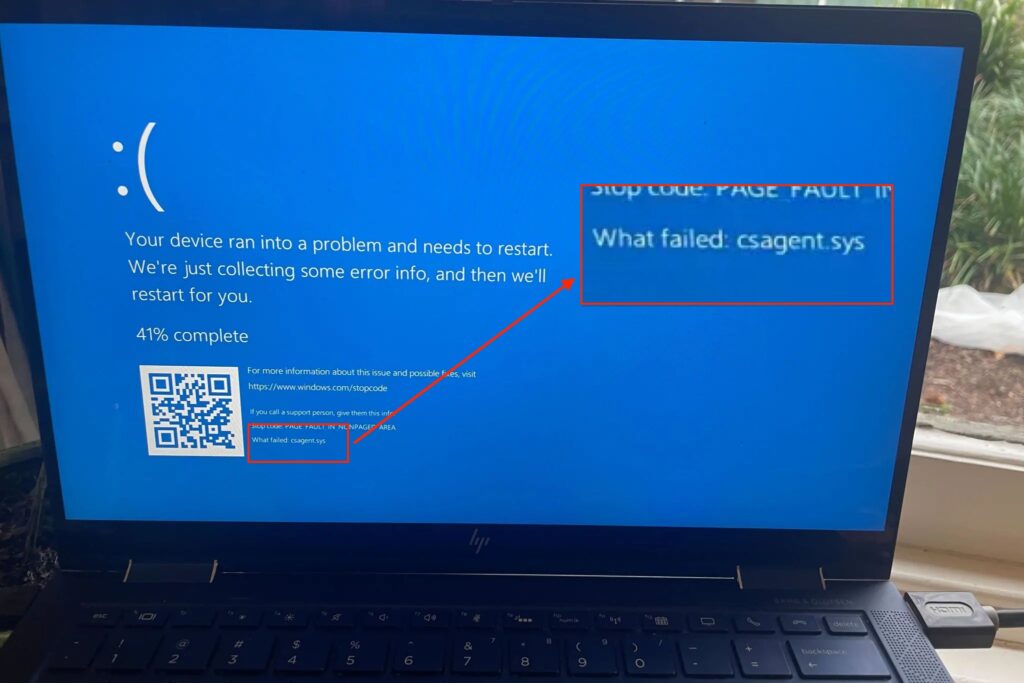
Several media companies, tech firms, and educational institutions have reported encountering the Blue Screen of Death (BSOD) on Windows 10 systems. The affected PCs are stuck at the “Recovery” screen, displaying the message: “It looks like Windows didn’t load correctly. If you’d like to restart and try again, choose Restart my PC below.”
Update from Microsoft and CrowdStrike
In a statement to Windows Latest, Microsoft acknowledged the issue, attributing it to a recent update from a third-party software platform. Microsoft assured users that a resolution is forthcoming.
Security company CrowdStrike has confirmed that the massive Windows 10 BSOD outage is due to a new update to its sensors. CrowdStrike, known for its endpoint protection services, identified that the update is causing significant issues.
Identifying the Cause
On various social media platforms, there are widespread reports of BSOD errors linked to multiple versions of CrowdStrike sensors. Windows Latest’s tests revealed that the csagent.sys (or C-00000291*.sys) file is the culprit. Deleting or renaming this file or its containing folder can resolve the boot issue.
Fixing the Blue Screen of Death and “Recovery” Loop
Method 1: Use Safe Mode and Delete the Affected File
- Boot to Safe Mode:
- On the Recovery screen, click “See advanced repair options.”
- Select “Troubleshoot” > “Advanced options” > “Startup Settings” > “Restart.”
- After restarting, press 4 or F4 to boot into Safe Mode.
Alternatively, you can shut down the PC, turn it on, and repeatedly press F8 until the Advanced Boot Options menu appears. Select Safe Mode from there.
- Open Command Prompt:
- In Safe Mode, open Command Prompt (Admin) or Windows PowerShell (Admin).
- Navigate to the CrowdStrike Directory:
- Type
cd C:\Windows\System32\drivers\CrowdStrikein Command Prompt.
- Type
- Delete the Affected File:
- Locate the file matching the pattern
C-00000291*.sysby runningdir C-00000291*.sys. - Delete the identified file using
del C-00000291abc.sys(replaceabcwith the actual file name).
- Locate the file matching the pattern
Method 2: Use Safe Mode and Rename the CrowdStrike Folder
- Boot to Safe Mode:
- Follow the same steps as in Method 1 to boot into Safe Mode.
- Open Command Prompt:
- In Safe Mode, open Command Prompt.
- Navigate to the Drivers Directory:
- Type
cd \windows\system32\driversin Command Prompt.
- Type
- Rename the CrowdStrike Folder:
- Use the command
ren CrowdStrike CrowdStrike_oldto rename the folder.
- Use the command
- Restart the Computer:
- This should allow the PC to boot to the desktop.
Method 3: Use Registry Editor to Block CSAgent Service
- Boot to Safe Mode:
- Follow the same steps as in Method 1 to boot into Safe Mode.
- Open Registry Editor:
- Use Win+R to open the Run dialog, type
regedit, and press Enter.
- Use Win+R to open the Run dialog, type
- Navigate to the CSAgent Key:
- Go to
HKEY_LOCAL_MACHINE\SYSTEM\CurrentControlSet\Services\CSAgent.
- Go to
- Edit the Start Value:
- Find the
Startentry on the right pane, double-click it, and change its value from 1 to 4. - Click OK to save the changes.
- Find the
- Restart the Computer:
- This change disables the CSAgent service, allowing Windows to boot normally.
Understanding the Registry Changes
The path HKEY_LOCAL_MACHINE\SYSTEM\CurrentControlSet\Services\CSAgent contains configuration settings for the CSAgent service, part of the CrowdStrike agent. The Start value determines when the service starts:
- 0: Boot start (rarely used).
- 1: System start (loaded by the I/O subsystem).
- 2: Automatic start (loaded during system startup).
- 3: Manual start (requires manual initiation).
- 4: Disabled (service does not start).
Changing this value to 4 turns off the service, resolving the boot loop issue caused by csagent.sys.
By following these methods, you can resolve the BSOD and “Recovery” loop issues caused by the recent CrowdStrike update on Windows 10 systems.
Disclaimer: This blog is for educational purposes only, promoting awareness of ethical hacking and cybersecurity to help readers protect against cyber threats. All content is based on lawful experiments on our own systems. No illegal activities are endorsed. Users agree to apply the information responsibly and legally. The blog and author are not liable for any misuse. By using this blog, you agree to use all knowledge ethically and legally. [Read full disclaimer].


