If you haven’t downloaded windows server check out this article? How to Download Windows server?
To set up Active Directory Domain Services (AD DS) in Windows Server 2022, follow the detailed steps below. I’ll guide you through configuring a static IP address, installing AD DS, and promoting your server to a domain controller.
Step 1: Set Up a Static IP Address
- Open Network Settings:
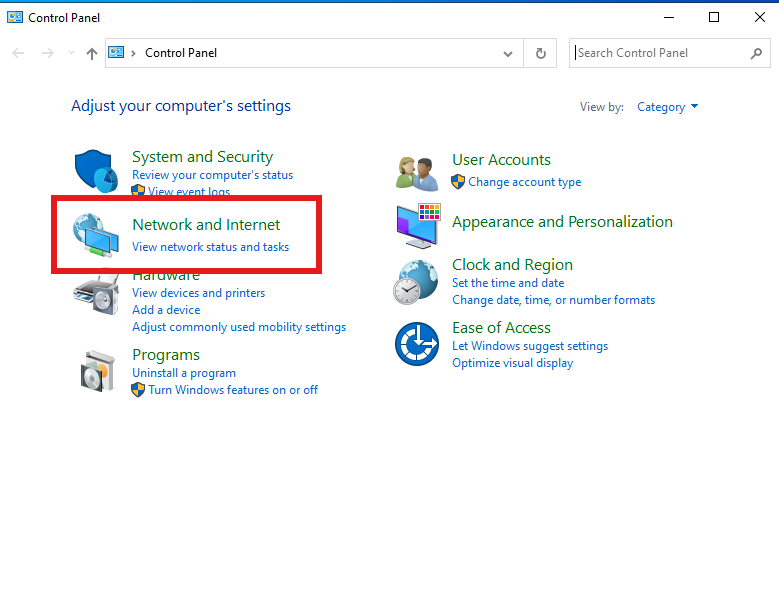
- Open Control Panel > Network and Internet.
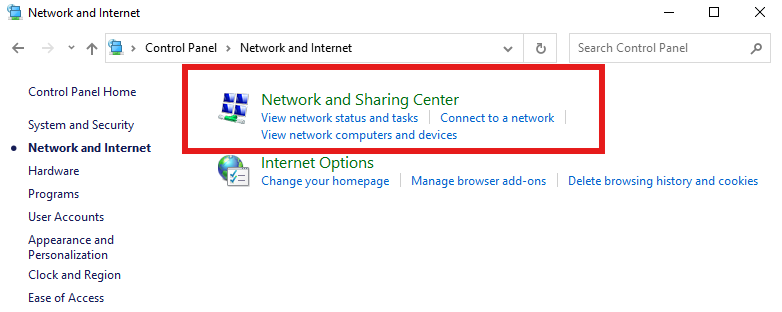
- Click on Network and Sharing Center.
- Open Control Panel > Network and Internet.
- Configure Ethernet Settings:
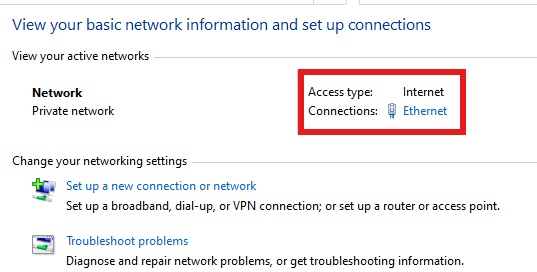
- In the Network and Sharing Center, click on Ethernet.
- In the Ethernet Status window, click on Properties.
- In the Network and Sharing Center, click on Ethernet.
- Set Static IP Address:
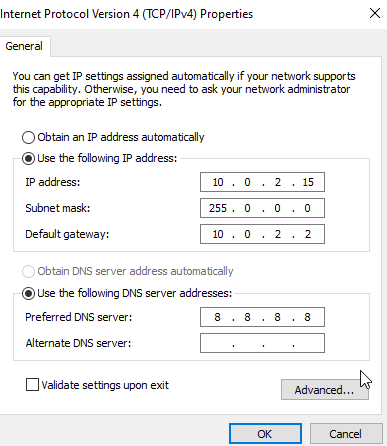
- In the Ethernet Properties, scroll down and select Internet Protocol Version 4 (TCP/IPv4), then click Properties.
- In the IPv4 Properties window:
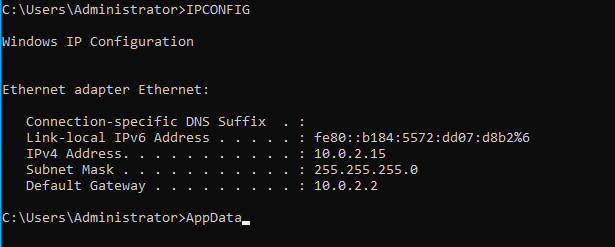
- Check your ip-address in CMD using “ipconfig” command.
- You can set the same Ip address in properties section.
- Enter the IP address, Subnet mask, and Default gateway. Make sure this is consistent with your network configuration.
- Enter the Preferred DNS server and Alternate DNS server if required.
- Check your ip-address in CMD using “ipconfig” command.
- Click OK to save your settings.
- Close the Ethernet Properties window.
Step 2: Install Active Directory Domain Services (AD DS)
- Open Server Manager:
- Click on Start and open Server Manager.
- Click on Start and open Server Manager.
- Add Roles and Features:
- In Server Manager, click on Manage in the upper-right corner, and select Add Roles and Features.
- Click Next to proceed through the Before You Begin screen.
- In Server Manager, click on Manage in the upper-right corner, and select Add Roles and Features.
- Select Installation Type:
- Choose Role-based or feature-based installation and click Next.
- Choose Role-based or feature-based installation and click Next.
- Select the Server:
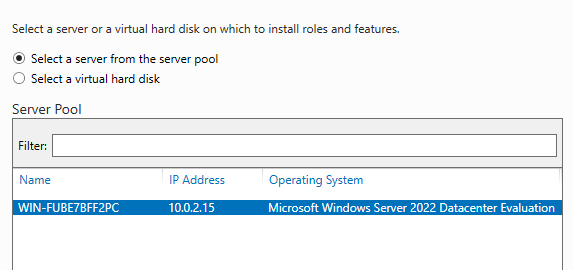
- Ensure your server is selected from the Server Pool and click Next.
- Ensure your server is selected from the Server Pool and click Next.
- Select Server Roles:
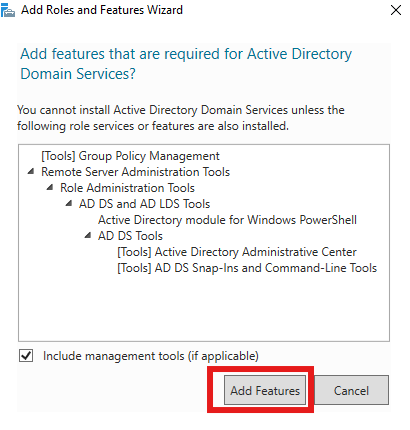
- Scroll down and select Active Directory Domain Services.
- A window will pop up asking if you want to add the features required for AD DS; click Add Features.
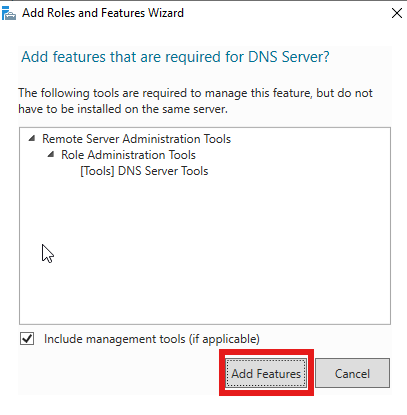
- Scroll down further and select DNS Server, then click Add Features.
- Click Next to proceed.
- Feature Selection:
- Leave the default features selected and click Next.
- Confirm Installation Selections:
- Review your selections. You can opt to check Restart the destination server automatically if required.
- Click Install and wait for the installation to complete.
- Review your selections. You can opt to check Restart the destination server automatically if required.
- Promote to Domain Controller:
- Once the installation is finished, click on Promote this server to a domain controller.
- Once the installation is finished, click on Promote this server to a domain controller.
Step 3: Promote Server to Domain Controller
- Deployment Configuration:
- In the Active Directory Domain Services Configuration Wizard, select Add a new forest.
- Enter your Root domain name (e.g.,
home.local) and click Next.
- Set your Password.
- DNS Options:
- On the DNS Options screen, IGNORE the Create DNS delegation option and click Next.
- On the DNS Options screen, IGNORE the Create DNS delegation option and click Next.
- Additional Options:
- The NetBIOS name will be automatically generated based on your domain name. You can modify it if necessary, but usually, the default is fine. Click Next.
- The NetBIOS name will be automatically generated based on your domain name. You can modify it if necessary, but usually, the default is fine. Click Next.
- Paths:
- Leave the Database, Log files, and SYSVOL paths at their default locations unless you have a specific reason to change them. Click Next.
- Leave the Database, Log files, and SYSVOL paths at their default locations unless you have a specific reason to change them. Click Next.
- Review and Install:
- Review all the settings in the Review Options page. If everything looks correct, click Next.
- The wizard will perform a Prerequisites Check. If no critical issues are found, you can proceed with the installation by clicking Install.
- Review all the settings in the Review Options page. If everything looks correct, click Next.
- Final Steps:
- The server will automatically restart after the installation is complete.
Step 4: Verify AD DS Installation
- Post-Restart:
- After the server restarts, log in with your domain credentials.
- Check AD DS Status:
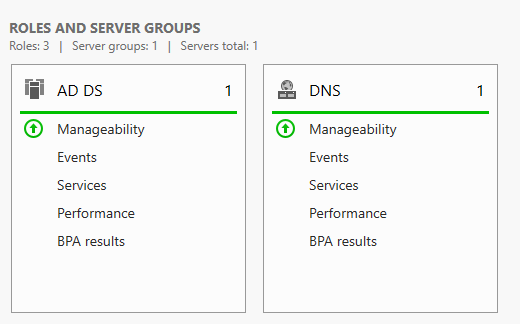
- Open Server Manager and check that AD DS is listed and showing as healthy in the dashboard.
- Open Server Manager and check that AD DS is listed and showing as healthy in the dashboard.
- Confirm DNS Configuration:
- Ensure that the DNS server is correctly configured to handle your domain.
You now have a Windows Server 2022 machine set up as a domain controller with Active Directory Domain Services. This is the foundation for managing a network of computers within your domain.
Disclaimer: This blog is for educational purposes only, promoting awareness of ethical hacking and cybersecurity to help readers protect against cyber threats. All content is based on lawful experiments on our own systems. No illegal activities are endorsed. Users agree to apply the information responsibly and legally. The blog and author are not liable for any misuse. By using this blog, you agree to use all knowledge ethically and legally. [Read full disclaimer].


